Toilet Paper/Paper Towel Roll Seed Pots
1. Get a pair of scissors and as many toilet paper or paper towel rolls as you can find.
2. Flatten the roll in half lengthwise, then fold in half again, so that there are four folds along the length of the roll.
3. Cut the roll in half (for paper towel rolls, cut the roll into five sections).
4. With your scissors, cut along the four fold lines on one side of the roll. Make the cuts about 1/2 to 3/4 inch long.
5. Fold each flap of the roll in, one at a time.
6. Tuck the last flap under the first flap to secure it, the way you would close a box top.
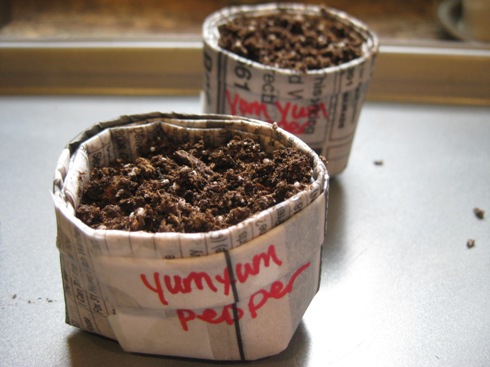
7. Label the pots (if desired).

Fill the pots with moistened seed starting mix and add your seeds.

Newspaper Seed Pots
1. Gather up some whole newspaper sheets (one page) and any container with straight sides and an open mouth. Avoid newspaper with color photos or shiny paper. I was out of paper so I went to the bookstore. The New York Times was one of the best papers for having the smallest number of color photos. If you can get the Sunday edition, you can probably make an army of pots!
Select a container based on the size pot you want to make. I wanted small pots the approximate size of the toilet paper roll pots, so I used a small (approximately 1 ounce) spice jar. When I'm ready to transplant seedlings into larger pots, I'll use a large drinking glass or a 1- or 2-liter plastic bottle.
2. Fold the paper in half lengthwise and smooth the crease.
3. Fold in half lengthwise again.
4. On the creased edge of the paper, create a small "lip" for the pot by folding the paper about 1/2 inch. (This makes it look a little nicer and adds some extra stability to it). Smooth the crease.
5. If you're using larger newspaper sheets and making smaller pots, you can cut the newspaper sheet in half, which will give you about two layers to your pot. If you prefer a very sturdy pot with several layers of paper, you can use the whole sheet.
6. Place the paper on a work surface with the "lip" of the pot (see step 4) facing down and pointing toward the bottom of the container. Position the top of the container approximately in the center of the paper.

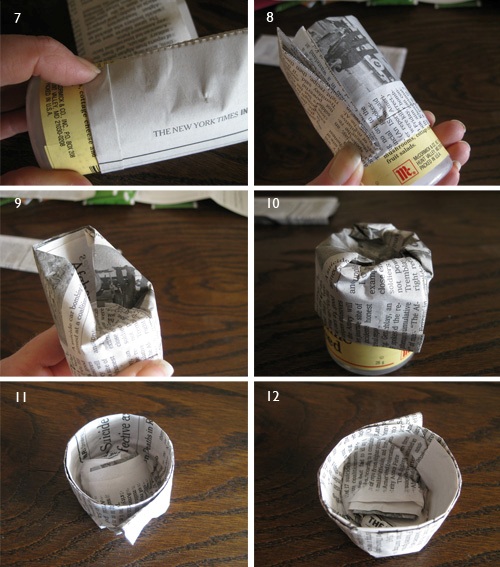
7. Begin rolling the paper as snugly as you can around the container. Notice that the lip of the pot is on the outside.
8. Continue rolling the paper around the container until you reach the end of the paper. Use your finger to hold the paper securely in position.
9. Beginning with the side of the pot with the end of the paper, push the paper into the open container. Don't worry about being perfect. Just cram it in there.
10. Move around the pot, pushing the paper into the opening of the container.
11. Carefully pull the pot off the container. The bottom of the pot will be sticking up inside the pot a little bit. It's a little hard to see in the photo, but the bottom of the pot is sticking up about 1 inch.
12. With the bottom of the pot on a solid surface, use your fingers or the bottom of the container to carefully push the bottom of the pot down.

Label the pots if desired, fill them with moistened seed starting mix, and add your seeds.

I line up all the pots according to the seed type and place them on an old cookie sheet. I cover them with a piece of plastic wrap to keep the humidity high until the seeds sprout. For the peppers, I also place the cookie sheet on an electric heating pad set on low to help them germinate. They like to be warm and snuggly!
Good luck in your seed starting adventures. I'd love to hear what you grow and how many pots you make. And be careful, making these little pots is strangely satisfying and quite addicting!


Whoa! Thanks for the tutorial! I'll try to do that on my own. I need to get the courage to start the darn vegetables no matter what critters lurk about. These are city critters...I don't know what will keep them out! :)
ReplyDeleteOoo! Perfect. I hoard toilet paper roles for my dog that likes to shred, but I always have too many so perfect!
ReplyDeleteNot only are those efficient and practical....they are just plain adorable!
ReplyDeleteThat's funny to hear about another dog that likes to shred toilet paper rolls. I have to hide them from Sadie. It is such a big thrill for her when I give one to her. And my mom's dog, Lucy, regularly checks the trash cans in the bathrooms looking for them!
ReplyDeleteIt just proves that the cheap toys are the best toys.
ReplyDeleteI love these! I'm putting together a little gardening post on my blog, and I'll be including these (with credit and a link of course). Thanks for sharing such a cool project!
ReplyDelete