Showing posts with label DIY. Show all posts

Tuesday, February 8, 2011

Seed pots

It's just about time for me to start thinking about starting some seeds for my garden this year. Last year I tried two DIY projects for starting seeds using eggshells and pots made from recycled toilet paper rolls and newspaper.

If you're thinking of starting some seeds yourself, you may be interested in the results of my experiment last year that showed that the eggshell seedlings did much, much better than the ones grown in the paper pots. I think it had a lot to do with my busy schedule: the paper pots dried out much faster than the eggshells, and I wasn't always good about checking them to see if they needed to be watered. The paper pots also had a tendency to mold if they were placed too close to each other.

Eggshell and paper cup tomatoes

Eggshell tomatoes

One other tip I can share about the eggshell pots: you can use a Sharpie or other permanent marker to write the seed type on the eggshell, but just be sure that this part of the eggshell is protected from direct sunlight because it has a tendency to fade over time (or check the shells every now and then and rewrite the seed type if necessary).

Happy seed sowing!

Wednesday, October 6, 2010

Pegboard

Back when the girls were small, they lived in a cardboard box in our bathroom. They quickly outgrew that, but their chicken house wasn't ready, so the husband bought a 4x8 piece of pegboard from Home Depot for about $6, cut it into four pieces, and wired the ends together to form a temporary chicken coop in our workshop.

Now that the girls have moved into their luxurious accomodations, I have four pieces of pegboard that need a new home. I'm thinking of sprucing them up with some paint and hanging them on this long wall in the studio, between the top of the base cabinets and some upper shelves I plan to install.

New letterpress studio

I've been searching through Google images looking for ideas and inspiration, and here are a few of my favorites (shame on me for not saving their original link!). Have any of you used pegboard to organize your stuff? I'd love to see what others have done!

ss_101014779_thumb[2]

ss_100091212_thumb[2]

Pegboard organization

toolzinebill

And in the world of freaky coincidences, I see that someone else has this same idea today! I guess printers' minds think alike. :)

Friday, March 12, 2010

Eggshell seed pots

How is the green-thumb crowd doing out there? Has anyone started any seeds yet?

If you'd like to start some seeds but you've used up your supply of toilet paper/paper towel rolls and newspaper to make these seed pots, I have a solution for you. Use eggshells!

1. Start by saving all your eggshells whenever you cook with eggs. You can either crack them in half to get two shells or, like I did, remove just the top portion of the eggshell so that you have a deeper "container" for your seed. Rinse them out and let them air dry.

If you just cut the tops of the shells off, be sure to save them. They can either be ground up and added to the compost pile, or they can be broken into pieces and placed on the ground around the plant once it's in the garden. They add a little layer of protection--an eggshell moat of sorts--because many bugs don't like to climb over the sharp pieces. 

Eggshell seedlings (3)

2. Poke a hole in the bottom of the shell for drainage. Because moisture won't evaporate as quickly as it will with the paper seed pots, it's important to provide drainage. After experimenting with several options, I found that the easiest thing is to set the eggshell bottom down on a folded towel (or anything soft), and then use the tip of a ball-point pen to poke a hole through the bottom of the eggshell. Using this method I didn't crack a single shell.

Eggshell seedlings (7)

3. At this point you can either write the name of the seed directly onto the shell, or you can supersize it by dying the eggshell! I wanted red shells for my tomatoes, green shells for my basil and other herbs, and blue shells for some flower seeds.

I got an old coffee cup, added about 1 tablespoon of vinegar and about 20 drops of either red, green, or blue food coloring, and then filled the cup up with warm water. Then just dunk your shells into the cup. Leave the shells in the solution until they are as dark as you want. (Note: If you dye your shells, be careful about letting them sit in water after you've planted seeds, because the color may run a little bit.)

Eggshell seedlings (8)

4. Remove the shell from the cup using a fork or a slotted spoon, and turn upside down on a paper towel to dry. 

IMG_6896

5. Label the shells (I found that it was easiest to lay the shell on its side and rest my arm on our 2-inch thick cutting board so that I could write clearly without putting pressure on the shell), fill with pre-moistened seed starting mix, and add your seed.

004

6. I didn't have an extra egg carton handy, so I filled a small baking dish with gravel (you could also use sand or dry rice) and nestled the shells down into the gravel so that they would stand upright.

002

Now sit back and let Nature do her thing. And if you start now, you can have some nice little eggshell seedlings in time to give as sugar-free gifts for Easter!

One very nice thing about the eggshells is that they don't dry out as quickly as the paper pots. I check on them every day but usually only need to water them every other day, versus sometimes twice a day for the paper pots. The downside is that they are a little bit fragile! Just be careful when you pick them up or move them. But even if they get small cracks in them, they should still last until you're ready to transplant your seedling into a larger pot. 

Coming up next week, I'll have part 2 of Composting 101: Soil Preparation, including some information on lawns for Sandy C!

Thursday, February 25, 2010

Tote bag sewing project

How gorgeous is this bag made from an old curtain? Jessica over at How about Orange is awesome.


See her post for a link to a tutorial on how to make one of these. I can't wait to get to the part of my list of things to do this year that involves learning how to sew. I'll have to keep an eye out for cool old curtains...

Thursday, February 18, 2010

Seed pot tutorial

I had a request for directions on how to make the seed pots, so here you go:

Toilet Paper/Paper Towel Roll Seed Pots

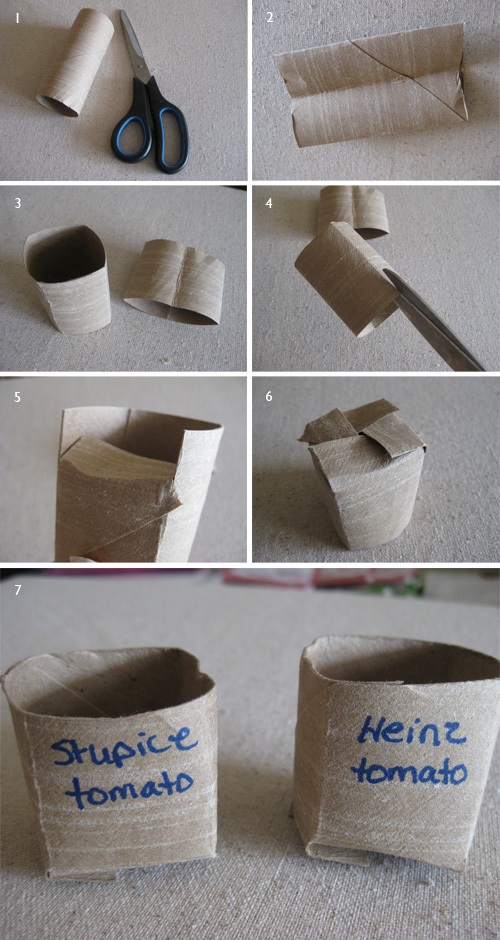
1. Get a pair of scissors and as many toilet paper or paper towel rolls as you can find.

2. Flatten the roll in half lengthwise, then fold in half again, so that there are four folds along the length of the roll.

3. Cut the roll in half (for paper towel rolls, cut the roll into five sections).

4. With your scissors, cut along the four fold lines on one side of the roll. Make the cuts about 1/2 to 3/4 inch long.

5. Fold each flap of the roll in, one at a time.

6. Tuck the last flap under the first flap to secure it, the way you would close a box top.

7. Label the pots (if desired).

TP Roll Seed Pot Tutorial

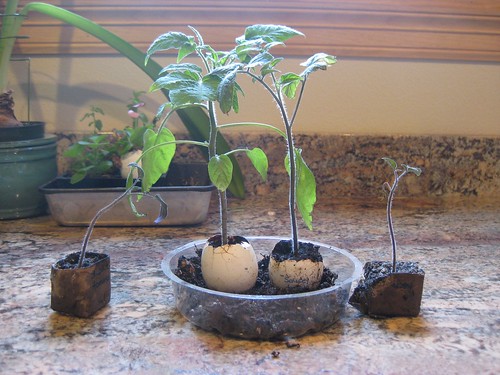
Fill the pots with moistened seed starting mix and add your seeds.

2010 seeds grp 1_peppers 004

Newspaper Seed Pots

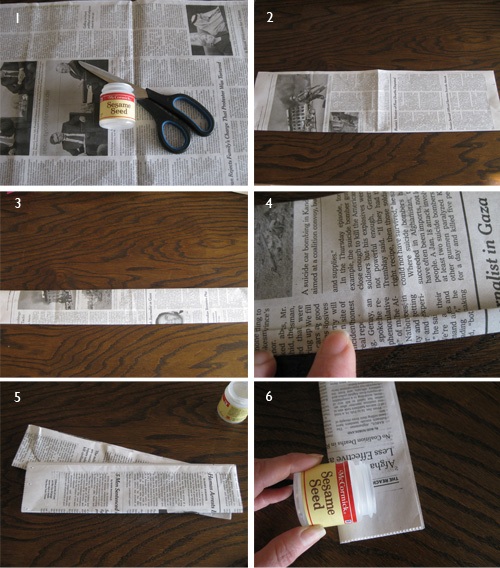
1. Gather up some whole newspaper sheets (one page) and any container with straight sides and an open mouth. Avoid newspaper with color photos or shiny paper. I was out of paper so I went to the bookstore. The New York Times was one of the best papers for having the smallest number of color photos. If you can get the Sunday edition, you can probably make an army of pots!

Select a container based on the size pot you want to make. I wanted small pots the approximate size of the toilet paper roll pots, so I used a small (approximately 1 ounce) spice jar. When I'm ready to transplant seedlings into larger pots, I'll use a large drinking glass or a 1- or 2-liter plastic bottle.

2. Fold the paper in half lengthwise and smooth the crease.

3. Fold in half lengthwise again.

4. On the creased edge of the paper, create a small "lip" for the pot by folding the paper about 1/2 inch. (This makes it look a little nicer and adds some extra stability to it). Smooth the crease.

5. If you're using larger newspaper sheets and making smaller pots, you can cut the newspaper sheet in half, which will give you about two layers to your pot. If you prefer a very sturdy pot with several layers of paper, you can use the whole sheet.

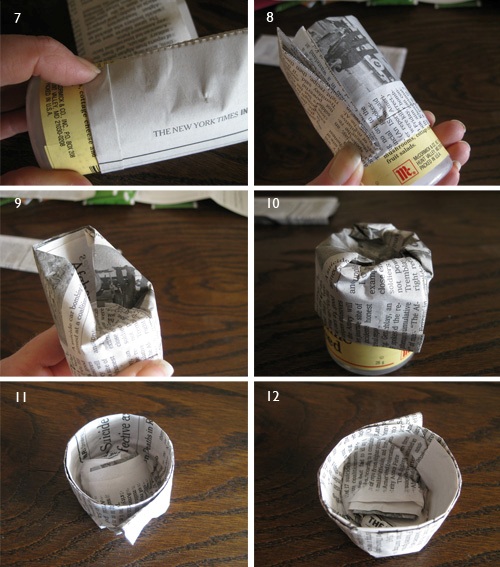
6. Place the paper on a work surface with the "lip" of the pot (see step 4) facing down and pointing toward the bottom of the container. Position the top of the container approximately in the center of the paper.

Newspaper Seed Pot Tutorial1

7.  Begin rolling the paper as snugly as you can around the container. Notice that the lip of the pot is on the outside.

8. Continue rolling the paper around the container until you reach the end of the paper. Use your finger to hold the paper securely in position.

9. Beginning with the side of the pot with the end of the paper, push the paper into the open container. Don't worry about being perfect. Just cram it in there.

10. Move around the pot, pushing the paper into the opening of the container.

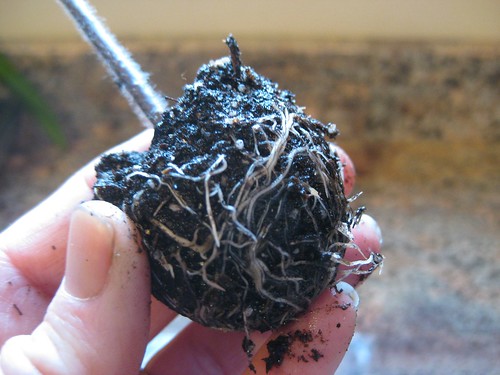
11. Carefully pull the pot off the container. The bottom of the pot will be sticking up inside the pot a little bit. It's a little hard to see in the photo, but the bottom of the pot is sticking up about 1 inch.

12. With the bottom of the pot on a solid surface, use your fingers or the bottom of the container to carefully push the bottom of the pot down.

Newspaper Seed Pot Tutorial2

Label the pots if desired, fill them with moistened seed starting mix, and add your seeds.

2010 seeds grp 1_peppers 003

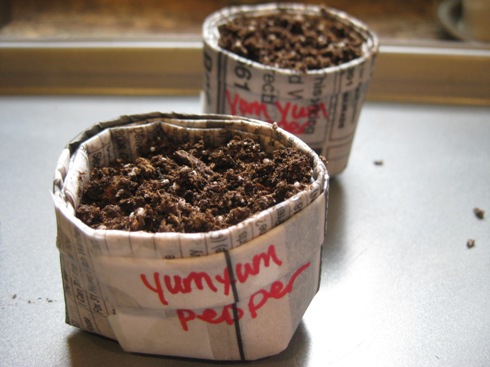
I line up all the pots according to the seed type and place them on an old cookie sheet. I cover them with a piece of plastic wrap to keep the humidity high until the seeds sprout. For the peppers, I also place the cookie sheet on an electric heating pad set on low to help them germinate. They like to be warm and snuggly!

Good luck in your seed starting adventures. I'd love to hear what you grow and how many pots you make. And be careful, making these little pots is strangely satisfying and quite addicting!

Thursday, January 7, 2010

Things to do in 2010: Part 3

Number 3 on my list is to finally get around to making a terrarium. I wanted to do it all last year. I started one with some succulents, but then it got stuck on the table behind my small press and I forgot about it...

Better yet, maybe I'll make a mini indoor garden. I love all things miniature, and these tiny gardens are absolutely adorable. I might have to make a xeriscape version of them.


From The Garden Barn and found via How about Orange.

Wednesday, December 16, 2009

Great white gift wrap

I feel like I've been MIA from blogland for ages. I'm catching up on posts in my google reader, and I've saved so many pretty images to my inspiration folder.

What really caught my eye in today's posts are these ideas for some simple but gorgeous gift wrapping by Grey Likes Weddings featured on Style Me Pretty. Each year I pick a main color for my holiday gifts. This year is red, but I think next year I might just go with this white, cream, and beige palette. I love it, and I especially love that I can buy all the pieces in bulk and be able to use them for gifts throughout the year, with just some small tweaks to make them occasion-specific.


You can find the DIY tutorial for all these lovelies right here.


Wednesday, October 21, 2009

Origami koi


I just watched Mabona Origami's absolutely stunning stop motion video of how to fold an origami koi. Wow!!


If you have the time, browse through their website's galleryblog, and flickr page (make sure you look at the praying mantis!) for more amazing origami creations.

Found via Soolip.

Friday, September 4, 2009

Canning swap parties

It's still not too late this season to can some fruits or vegetables--whether it's the harvest from your own garden or the bounty you brought home from your local farmers' market.

But unless you want to embark upon a canning marathon to achieve a nice variety of canned goods, what does one do with 28 jars of peach jam (other than eat a lot of peanut butter and peach jam sandwiches)?

One awesome solution is to have a canning swap party, a very cool idea a friend told me about over at Food Routes. And it's really easy to do. Gather your friends who are canners; have each person bring their canned goods--canned fruits, salsa, pickles, jams, etc; and swap canned items with each other, giving extra credit (i.e., extra jars) for more-difficult-to-produce items.

If everyone can bring enough items to the party, you can even open a jar for a taste test.

Here are some tips for hosting your own swap party:
1. Plan ahead, if possible, and remind fellow canners throughout the growing season to keep everyone motivated.
2. Try new recipes.
3. Be aware of how time-consuming some items are, and trade fairly.
4. Consider including other preserved items, such as dried fruit, jerky, or home-brewed beer.

If you've never tried your hand at canning before, do it this year. It's really quite easy. The Pioneer Woman has great illustrated tutorials on making jam here and here. My only addition to her instructions is to be sure to alter your boiling time based on the elevation where you live. The higher the elevation, the longer you need to boil the jars (i.e., at less than 1,000 feet, boil for 10 minutes, and increase boiling time by 1 minute for each additional 1,000 feet of elevation). When in doubt, check out the USDA food safety page for some guidelines.

Jam 002

And don't be afraid to try new recipes or make your own. For the last two years I've made a wide variety of jams. Shown here in the top row are peach cherry and apricot cherry jams (made from cherries from the husband's uncle's cherry orchard and our apricots), and on the bottom row are spiced peach, orange pear, and plum jam (made from our own blood plum trees). I also created some other recipes including peach almond, ginger pear, and cranberry pear jams, but they were dang good and we already ate all of them.

So, take some time over the holiday weekend and try it out if you've never done it before.

Happy canning!

Thursday, August 6, 2009

DIY garden trellis

Sunset has a great DIY article on how to build a trellis for climbing plants using tree branches from around your house. Finally, a project that can use all the branches that are always falling off our willow tree!


See the full article and instructions here.

Monday, July 13, 2009

My wedding: Part I

I swore I was never going to be the kind of bride that bought an insane dress that I'd only wear once in my life. I mean, how ridiculous. Right? I promised myself that I wouldn't spend more than $300 on a dress. And then I made the mistake of trying on some that were just a tiny bit more expensive. And then just a tiny bit more expensive. And then... and then I tried on this one, and my mom's face just lit up. End of story. :)


We got married at my parents' house in the mountains east of Albuquerque, NM. It's gorgeous there, so we just spread some wood mulch in the area. I didn't want to compete with the beautiful surroundings, so my mom and I made some simple pomanders out of cream paper napkins (one of my DIY ideas on crack) and hung them in the trees.


My colors were chocolate, ivory, pomegranate, plum, and wine. In March I started going to Home Depot, Lowe's, and every local nursery every week, looking for flowers in the right colors to plant around the house. These English daisies are still my favorite.


My original plan had been not only to make my own bouquets, corsages, and boutonnieres, but to grow my own flowers (another DIY idea on crack). In the end, an unusally cool spring meant that most of the flowers didn't grow well enough to harvest, and the ones that dig grow well enough ended up being too pretty too cut. So the day before the wedding my mom went to a grocery store and bought daisies, mums, and carnations that happened to be the perfect color, and I walked around the house and picked wild white clover, purple wildflowers, mint, rosemary, and blooming sage for the bouquets.


For the corsages and boutonniers, I used a lot of hens and chicks that some family friends gave me, and some pink and burgundy miniature dahlias I grew. Then I added things I picked around the house that morning--dusty miller leaves, grass stems, scrub oak leaves, mint, rosemary, and snapdragon buds. I was still making them while I was having my hair done! But they were one of my favorite projects from the whole wedding.


All photos are by Vladimir Chaloupka, the world's most amazing photographer ever. Seriously.

Thursday, July 2, 2009

DIY cupcake cards

You can make your own super cute (and easy!) cards with a little pizzaz. All you need is a paper hole punch in a neat shape, some glue, paper, and a little imagination.


Find the complete DIY instructions over at Paper Source and don't forget that their offering 20% off everything online through July 4!

Wednesday, June 24, 2009

DIY tissue paper garden centerpieces

The other day I showed you the adorable wedding invitations and cake from Anna Bond's wedding.

Well, now Anna, of Rifle Design, is sharing her creativity with DIY projects over at Once Wed. Her first project is this tissue paper garden centerpiece, which she used at her own wedding. They don't require anything fancy, and at just about $7 each to make, they are quite affordable. They'd also be perfect for other events like birthday parties or bridal or baby showers. Or even just as a unique centerpiece for your own kitchen table!


For her own wedding, Anna also added some small paper animals among the moss so that it became a little miniature forest. Too cute.

See the complete instructions over at Once Wed.

Thursday, June 18, 2009

DIY catalog of love

My friend AJ just alerted me to this completely awesome DIY project featured on Design Sponge.

Grace Light from Poetic Home made her husband this gift to celebrate their 2nd wedding anniversary. She created her own Dewey Decimal catalog cards, where the book number is replaced by milestone dates, chapters of their love take the place of book titles, and important locations take the place of publisher cities.

I love it. And I realllly love that vintage card catalog box!


See the complete DIY instructions here. And be sure to spend some time at Poetic Home--there's some great stuff on there (I'm busy drooling over the refinished horse carriage seat!).

Friday, May 22, 2009

Tiny pots of moss

The perfect DIY project for my fascination with moss.


By Jordan from Oh Happy Day. See the complete DIY instructions over at Project Wedding.

Monday, April 27, 2009

Bird place cards

I saw these spring-inspired place cards earlier and then promptly forgot about them until just now. They are too cute for words.


Complete DIY instructions over at Scissor Variations.

Friday, April 17, 2009

Homemade soap

In addition to making candles, I've always wanted to make soap. It seems easy enough to do, I've just never actually gathered the goods and sat down to do it.


This morning I came across this DIY project on 100 Layer Cake, and the picture of the soaps all wrapped up is pretty enough to make me want to make some soap sometime soon. Right after I do those candles...

Find the full DIY instructions here.

Thursday, April 16, 2009

Candle in a tin

I love this idea for a DIY candle over at Design Sponge! They'd make great wedding favors or hostess gifts.


You can check out the full instructions here.

She used an old Altoids tin for this candle. I recently bought a giant box of round tin containers with screw lids to hold the letterpress ink colors that I mix by hand. I'm thinking I might use some of them to make this the next time I'm in the mood for DIY that doesn't involve hammers and paintbrushes. I got my containers from Specialty Bottle, a company I love because they don't make you buy a case of 100 of them! (They also have hinged tins like those use for Altoids!)

Tuesday, April 7, 2009

Handmade paper

I've often thought about making my own paper to use for some of my letterpress printing. Maybe once we finish remodeling our house I can think more about this. In the meantime, here's a nice little tutorial on Instructables that I just found on how to make your own paper.


via Soolip.

Wednesday, March 18, 2009

March favorites

It's time to start cleaning out my "favorites" file on my computer. So here are a few of my favorite things from around the internet lately.

A gorgeous farm table in a bright white, airy room. Via remodelista.


I love everything about this rustic kitchen in Sweden. The wood table, the wood floors. And those exposed wood beams! And what a fun light fixture, made from an old industrial whisk. The kitchen is so bright and airy, with a beautiful little pop of blue that makes me think of bird eggs, especially now that the robins have returned. Via remodelista.


If you're looking for a DIY project, you can even make your own whisk light fixture.


Speaking of robins, I love these metal garden stakes from Caroline Zoob,


and these glass balls encased in old fishing net, from Baileys Home and Garden.


And I just love this photo from Plantstuff. I found it awhile ago and I find myself coming back to it and just staring at it. It plays right into my obsessions for growing things, collecting small terra cotta pots, and anything with wood.

LinkWithin


The Handwork Chronicles | Template By Rockaboo Designs | 2012