Showing posts with label baking. Show all posts

Friday, January 27, 2012

Carrot pineapple muffins

I spent the better part of this morning searching for some new muffin recipes for Lachlan, and I came across the website Weelicious and I already love it! I ran to the store and got the fixins for four different muffins. As soon as we got home I started making the carrot pineapple muffins and the first batch came out of the oven just in time for Lachlan to stuff his face with a little more than one of them before his nap (and that's after he was stuffed full from his snack!).


The recipe was really easy. I increased both the pineapple and carrots, and I think next time I make it I'll increase the pineapple even more. These were really good. I've already had two. :)

Ingredients:
1 1/4 cup flour
3/4 cup whole wheat flour
2 tsp baking powder
1/2 tsp baking soda
1/2 tsp salt
1/2 cup melted butter
1/2 cup agave nectar or honey (awesome use of the agave nectar I got for the husband for Christmas!)
2 eggs
1 tsp vanilla extract
1/2 cup finely chopped pineapple or 1 8-oz can crushed pineapple, drained well
(I used about 3/4 cup pineapple and feel like I still could have added more for my taste)
1 cup shredded carrot (I ended up using about 1.5 cups)
1/2 cup walnuts, optional (I left these out)

1. Preheat oven to 350 degrees.
2. In a large bowl combine the flours, baking powder, baking soda and salt.
3. In separate bowl combine butter and agave. Add eggs and whisk to combine.
4. Add the vanilla, pineapple, carrots and walnuts (if using).
5. Stir in the dry ingredients. Be sure not to over mix.
6. Bake about 18 minutes or until a toothpick comes out clean.
YUM!

Thursday, December 8, 2011

Blueberry zucchini muffins

Lachlan and I struggle on a daily basis to find something he likes to eat. One day he loves lasagna. The next day he tries to throw it in my face. One thing he consistently likes is a muffin. But one flavor of muffin will only last a day or two before he's ready to move on to the next flavor experience. I search high and low for muffin recipes that look good but also look really healthy and nutritious. If the only thing he's going to eat is a muffin, it had better be good for him.

His latest favorite (which he's happily eaten several days now) is blueberry zucchini.


I found this recipe for a blueberry zucchini bread and then adapted it. This is the second time I've made it, tweaking it a bit each time, and I think this is the winning adaptation for us:

3 eggs, lightly beaten
1 cup vegetable oil
3 teaspoons vanilla extract
1 1/2 cups white sugar
4 cups shredded zucchini
3 cups whole-wheat flour
1 teaspoon salt
1 teaspoon baking powder
1/4 teaspoon baking soda
1 tablespoon ground cinnamon
1 pint fresh blueberries or one bag (about 14 ounces?) of frozen blueberries

 1. Preheat oven to 350 degrees F (175 degrees C). Lightly grease muffin pan or line with cupcake liners.                
2. In a large bowl, beat together the eggs, oil, vanilla, and sugar. Fold in the zucchini.
3. Beat in the flour, salt, baking powder, baking soda, and cinnamon.
4. Gently fold in the blueberries.
5. Transfer to the prepared muffin pan.
6. Bake about 20-25 minutes, or until a toothpick inserted in the center comes out clean.
7. Stuff your face (or watch your kid stuff his!)

Tuesday, November 1, 2011

Carrot apple muffins

I recently tried Christine's recipe for carrot apple muffins. They were fantastic! They are one of the few solid food items that Lachlan seems to like, and they are so healthy that I don't feel too guilty about stuffing 3 or 4 in my face!

If you have any carrots and apples sitting around, I recommend you try this recipe! I'll be making batch number 4 this week.


Speaking of feeling guilty, I know I still owe several of you your personalized cards. I haven't forgotten about you! I just haven't had a chance to print more samples because of some other things I have going on at the moment. I'm also still waiting on the treadle to come for the press. It's being made by a foundry in Idaho and will make life much easier. As it is now I have to turn the flywheel by hand 5 or 6 times just to print one card. It is slow going and I ended up with a blister on my hand from the last batch of cards I did. Hopefully I'll get the rest of the samples printed in the next 2 weeks. :)

Friday, June 24, 2011

Strawberry rhubarb crumble

I've lived on this planet for a good number of years and never (as far as I know) had rhubarb. I planted some rhubarb a few years ago but never got around to harvesting any. The other day I had 2 pounds of strawberries in the fridge I needed to do something with, so I went outside and grabbed a few stalks of rhubarb.

I was too lazy to make a pie crust. Heck, I was even too lazy to drive to the store to buy a premade pie crust! So I went in search of an easy recipe and came across this one on the epicurious app for my phone. The husband proclaimed this his new favorite crumble/crisp, and last night at our farmers' market he made me buy more rhubarb so I can make another one!

Strawberry rhubarb crumble

Ingredients:
3/4 cup flour
2/3 cup sugar plus 1/2 cup sugar
large pinch of salt
6 tablespoons chilled unsalted butter, cubed
1/2 cup old fashioned oats
1/2 cup chopped toasted hazelnuts (I used pecans)
1 teaspoon vanilla extract
1 pound strawberries, hulled and halved (about 4 cups) (I used 2 pounds because I had them)
12 ounces rhubarb, ends trimmed, stalks cut crosswise into 1/2-inch thick pieces (I used 5 stalks that were each about 12 inches)
1 1/2 teaspoons corn starch (optional)
vanilla ice cream

Isn't this mix of strawberries and rhubarb so pretty?

Strawberry rhubarb crumble

Strawberry rhubarb crumble

Directions:
Preheat oven to 375 degrees.
Combine flour, 2/3 cup sugar, and salt in medium bowl. Add butter. Mix in nuts and oats.
In separate bowl, add 1/2 cup sugar and vanilla and mix.
Add strawberries and rhubarb and toss to coat with sugar.
Scrape fruit into buttered 11x7x2-inch baking dish.
Bake until filling bubbles and topping is crisp, about 45 minutes.
Serve with vanilla ice cream.

Strawberry rhubarb crumble

Based on the recipe's reviews, I added 1 tbs cornstarch because a lot of people said the fruit mix was too soupy. I think 1 tbs may have been too much; 1 1/2 teaspoons might be all you need. I also doubled the fruit they recommended, and in that size of a baking it was still a very thin layer of fruit. So adjust the quantity of fruit and size of your dish based on whether you want a thin layer of fruit with topping or a more substantial amount of fruit.

You may also want to consider baking two of these at once, because when you eat some for breakfast, lunch, and dessert it doesn't last long!

Thursday, February 10, 2011

Making whoopie (pies)

This afternoon the stars and planets aligned just right and Lachlan not only took a nap at the perfect time, but he actually woke up and sat there happy as a clam for a bit rather than hollering for me. And so I had time to make some whoopie--pies that is--that I've wanted to try since Christmas.

A while back the husband pointed out this recipe for pumpkin whoopie pies with cream cheese filling in the Baked cookbook that I got for Christmas, and I just happen to still have a boatload of winter squash puree in the freezer. These turned out pretty awesome, but the recipe makes a LOT more than the 12 small whoopie pies listed in the book.

Pumpkin whoopie pie

Ingredients:
Pumpkin whoopie cookies
3 cups flour
1 teaspoon each: salt, baking soda, baking powder
2 tablespoons cinnamon
1 tablespoon each ginger, cloves
2 cups packed brown sugar
1 cup vegetable oil
3 cups chilled pumpkin puree (important that it is chilled to help cookie have a domed top)
2 eggs
1 teaspoon vanilla

Cream cheese filling
3 cups powdered sugar (I only used 2 cups to keep more of the flavor of the cream cheese)
1 stick unsalted butter, softened
8 ounces cream cheese, softened
1 teaspoon vanilla

Directions:
1. Preheat oven to 350 degrees.
2. In large bowl, whisk together flour, salt, baking powder, baking soda, and spices. Set aside.
3. In another bowl, whisk together oil and brown sugar. Add pumpkin puree and whisk to combine. Add eggs and vanilla and whisk until combined.
4. Add flour mixture to pumpkin and whisk until well combined.
5. Drop heaping spoonfuls of dough about 1 inch apart onto cookie sheets lined with parchment paper.
6. Bake for 10-12 minutes or until cookies are starting to crack on top and a toothpick inserted into center comes out clean.
7. Remove from oven and cool completely.
8. Make the filling by beating together the butter and cream cheese. Add powdered sugar and vanilla and mix well.
9. Turn over half of the cookies and top with a large spoonful of filling. Top with another cookie and press down slightly to spread filling to edge of cookie.

Enjoy!

Monday, January 3, 2011

Pumpkin chocolate chip loaf

Last year I grew a wide variety of winter squash that were amazing for eating with dinner. I also tried three new varieties of winter squash to use for baking. I planted the seeds late in the year, but I still managed to get more than enough squash to play with. I grew three different squash, all from seed from Territorial Seed Company: Long Island Cheese, Galeux d'Eysines, and Sweet Meat. I ended up with a nice assortment of squash to try out this year, including three nice sized Sweet Meat squash

Sweet meat

and one Galeux d'Eysines and three Long Island Cheese squash.

Long Island Cheese Galeux d Eysines

Although they probably would have kept in storage for quite a while this winter, I knew if I didn't do something with them before Goober gets here that I never would. So I spent the better part of Christmas eve roasting them and running them through a food mill to puree them. I put 4 cups of puree in freezer bags and threw them in the freezer for later. I lost count along the way, but I got somewhere near 32 cups of puree from all of these. I probably could have gotten more out of them, but I left plenty on the skins for a nice snack for the chickens.

I saved a little bit of puree from each squash for a taste test. In terms of the plain, untouched flavor, the husband and I ranked the Long Island Cheese as the best flavor, followed by the Sweet Meat and the Galeux d'Eysines.

Because I only had one medium sized Galeux d'Eysines, I put this puree into the fridge for a yet-to-be determined baking project. As it turns out, I got the first Baked cookbook for Christmas (yay!), so it seemed like fate when I opened the book and the first recipe I saw was for a pumpkin chocolate chip loaf (which was highly recommended by a blog reader in a previous post). So this weekend I used the puree to make four loaves of this bad boy.

Pumpkin bread

This morning I polished off the last bit of the first loaf, I sent one loaf to work with the husband, and I put the other two in the freezer, though I'm now thinking that was a mistake and I should have kept another one out to eat now! This is an awesome recipe and so, so easy to make.

Ingredients:

3 1/4 cups flour
2 teaspoons cinnamon
1/2 teaspoon nutmeg
1/2 teaspoon allspice
1/2 teaspoon ground ginger
2 teaspoons baking soda
2 teaspoons salt
1 3/4 cups pumpkin puree (or one 15-oz can)
1 cup vegetable oil
3 cups sugar
4 large eggs
1 teaspoon vanilla extract
2/3 cup room temperature water
1 1/2 cups (12 oz) semisweet chocolate chips

Directions:

1. Preheat oven to 350 degrees. Butter two 9x5x3 inch loaf pans and dust with flour. (Note: Make sure you grease and flour your pans very, very well. The first batch I made I used the Pam baking spray and had problems with the bottom of the loaves sticking to the pan. For the second batch, I greased and floured them really well. One turned out great, but the other one still stuck a bit. See other note below about the chocolate chips!)
2. In a medium bowl, whish together all of the dry ingredients.
3. In a large bowl, whisk together the pumpkin puree and oil. Add sugar. Whisk eggs in, one at a time, then add the vanilla. Add the water and whisk until combined. Using a rubber spatula, stir in the chocolate chips. (Note: The first time I made this I used the chocolate chips I had on hand, which were huge. The batter isn't very thick, so most of the chips promptly sank to the bottom once placed in the oven. This probably had a lot to do with the problems of the bottom of the loaf sticking. For the second batch I made, I bought normal sized chips and tried to take extra care to make sure that they were well distributed in the batter, and I also added another 1/4 cup flour to help thicken the batter. [I also took the liberty of adding some chopped pecans just because...] It seemed to help, but quite a few of the chips still ended up at the bottom. Next time I'll probably try using mini chips and see if that helps.)
4. Fold the dry ingredients into the wet, being careful not to overmix.
5. Divide the batter between the prepared pans.
6. Bake in the center of the oven until a toothpick comes out clean, about 1 hour and 15 minutes. Rotate the pans halfway through the baking time.
7. Transfer pans to wire rack to cool for 15 minutes. Invert loaves and cool.

Although this recipe is listed in the Breakfast section of the cookbook (yeah, baby!), the husband and I have had no problem snarfing this down at any time of the day. Enjoy!

Thursday, December 23, 2010

Dark magic gingerbread

What do you get when the perfect ginger snap and the most perfect brownie get together and have a baby? You get this bad boy.

If you like ginger snaps, you'll love this. If you don't like ginger snaps, try this anyway. You won't be sorry.

This recipe comes from the cookbook I got at Hell's Backbone Grill during our trip to Boulder, Utah last year. I had this for dessert both nights we ate there, and I still dream about it! I decided to make some this year to include in the "goody basket" I'm putting together for our neighbors. Sorry the picture is so lousy. It was taken at 6:30 this morning when I was trying to wrap it up. Seriously, you need to try this stuff.

Dark Magic Gingerbread

Ingredients:
3 cups white flour
2 teaspoons baking soda
1 teaspoon salt
3 teaspoons ground ginger
1 1/2 teaspoons cinnamon
1/2 teaspoon ground cloves
1/2 teaspoon Chimayo chile (leave out if you can't find it)
1 1/2 sticks butter
2 eggs
1 1/2 cups sugar
1 1/2 cups dark molasses
1 1/4 cup boiling water
1/2 cup diced pear
1 tablespoon chopped crystallized ginger

Directions:
1. Preheat oven to 350 degrees and grease and flour a 9x13" baking pan.
2. Sift or stir together the flour, baking soda, salt, and spices.
3. In large bowl, beat butter until creamy. Add sugar and eggs and beat on high speed until batter is light in color and texture. Slowly beat in molasses.
4. Add flour mixture and stir with spoon just until combined. Don't overmix.
5. Stir in boiling water and mix well, then add pear and crystallized ginger.
6. Pour into pan and bake for about 40 minutes (toothpick in center will come out clean and cake springs back when lightly pressed).

Best enjoyed warm with butterscotch sauce and whipped cream, but it's also just as fantabulous when enjoyed cold at 6am with morning coffee!!

Tuesday, December 21, 2010

Caramel popcorn with chocolate and peanuts

For my birthday I got a copy of the awesome new book Baked Explorations from my mom. I have only now started to explore the recipes, the first of which was one for caramel popcorn with peanuts and chocolate. Yeah, baby.

Caramel popcorn

If you're looking for a recipe to round out your holiday goodies this year, this one is mighty good. I think the molasses adds some interest to the usual caramel popcorn. Just a note that I only used the dark chocolate and the husband still thought the chocolate overpowered the caramel. I told him he's crazy, but if you prefer more caramel to chocolate, you might want to cut back on the amount of chocolate you use.

Enjoy!

Ingredients:
24 cups popped popcorn
2 sticks (1 cup) unsalted butter
2 cups firmly packed dark brown sugar
1/2 cup light corn syrup
2 tablespoons unsulfured molasses
1/2 teaspoon salt
3/4 teaspoon baking soda
1 1/2 teaspoons vanilla extract
1 1/4 cups salted peanuts
8 ounces melted milk chocolate
8 ounces melted dark chocolate

Directions:
1. Preheat oven to 250 degrees. Place popcorn in large roasting pan (or divide between several pans/bowls to make mixing with the caramel a little easier). Line a sheet pan with parchment paper.
2. Melt butter in medium saucepan over low heat. Add brown sugar, corn syrup, and molasses. Continue to heat over medium heat, stirring occasionally, until mixture starts to boil. Using a candy thermometer, bring mixture to 240 degrees (soft-ball stage).
3. Remove pan from heat and stir in salt, baking soda, and vanilla.
4. Pour caramel over popcorn and sprinkle with peanuts. Use spatula to ensure that popcorn is completely coated with caramel.
5. Place popcorn in roasting pan in oven and bake 15 minutes. Re-fold and coat popcorn with caramel and continue baking for 20 minutes.
6. Remove pan from oven and transfer to lined sheet. Let cool about 15 minutes and then drizzle with melted chocolate.
7. Once chocolate sets up, break popcorn into serving size pieces. Store in airtight container for up to 1 week or immediately begin stuffing your face with the awesome stuff.

Monday, July 19, 2010

The pits

Fifty cups of cherries pitted and frozen.

IMG_8236

Only about 100 more cups to go...

Friday, July 16, 2010

Three guesses

I'll give you three guesses what I'll be doing this weekend.

Here's a hint. The husband's uncle has a cherry orchard. I told you about how we pitted and processed his montmorency cherries last weekend. But he also grows tartarian cherries, which are large, dark red, and lip-smacking good sweet cherries.

Cherry picking 2010

His crop of tartarian cherries this year was really odd, probably due to our unusually cold winter and spring. Many of his trees didn't have cherries at all, and others had smaller cherries or cherries that were ripening at different times. The bottom line is that he decided it wasn't worth it to try to harvest them to sell.

That is music to my ears. Because if it isn't worth selling them, it isn't worth picking them, and then scavengers like me are allowed to go raid the trees. :)

So the husband and I went over there the other night and found about three trees that were just loaded with cherries.

Cherry picking 2010

We probably picked close to 80 pounds of cherries, and I spent yesterday sorting them and washing them by hand. That's much harder to do without a giant water bath and conveyor belt!

Now I'm faced with the unenviable task of pitting all those suckers, one at a time, by hand...

Cherry picking 2010

Oh, yeah. I also have to do something with all those apricots you see in the background!

Thursday, July 15, 2010

Life is just a bowl of cherries

The other day I mentioned that the husband and I celebrated our 2-year anniversary in rather unusual style. I prefer to go on a trip somewhere to celebrate, rather than exchange gifts, so we had planned to visit a small Colorado mountain town over the weekend.

But those plans changed when we got a call from the husband's uncle, Perry. It was cherry picking time, and so we spent the weekend at Perry's orchard about 20 minutes from our house, helping out with the annual harvest.

The whole process is really quite a production.

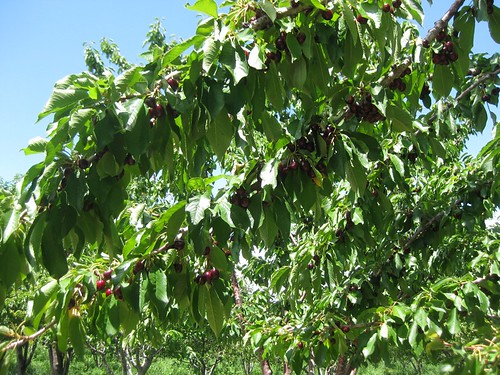
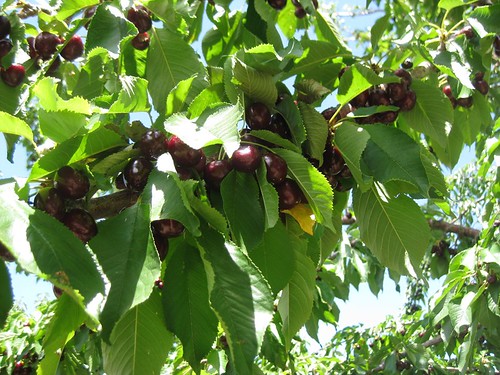
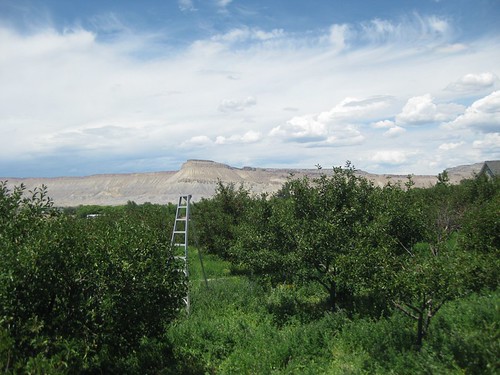
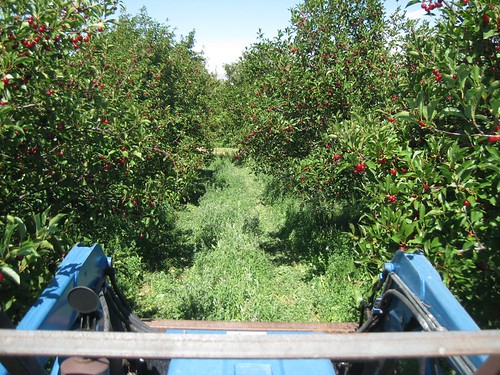
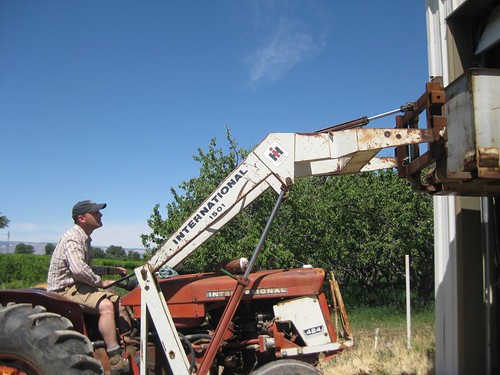
First, the husband headed out into the orchard with a team of pickers. His view out there was rather spectacular.

Picking cherries 2010

Picking cherries 2010

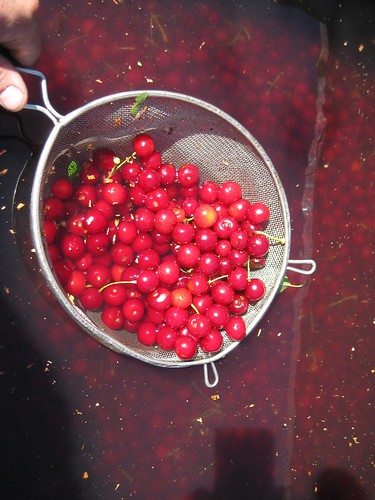
Perry grows two kinds of cherries: black tartarian sweet cherries and montmorency cherries, the tart little suckers that make their living in jams and pies. We were there to harvest the montmorency cherries, which I think are one of the most beautiful trees grown in the area.

Picking cherries 2010

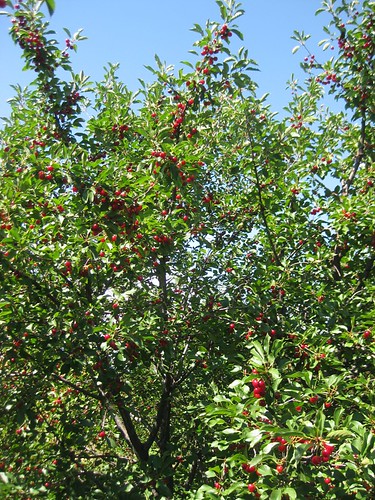
The cherries are the most vibrant light red color. It almost looks like they glow next to the smooth green leaves of the tree.

Picking cherries 2010

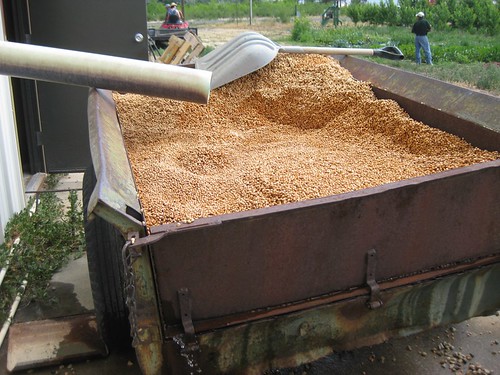
The husband was in charge of driving the tractor pulling a flatbead trailer with a large metal bin full of cold water. As the pickers filled each carton, they dumped it in the water in the bin, and the husband used a strainer to pull out any floating leaves or stems.

Picking cherries 2010

Once the bin was full (about 1,200* pounds of cherries), the husband brought the bin back to the processing area where he placed it up on a platform. (Have you ever heard that country-western song, "She thinks my tractor's sexy"? Now you know why that song was written...)

*Editor's note: Updated 7/16/10. The editor of the editor [the husband] just called from work to inform me that my original number of 200 pounds of cherries, based on my recollection of our conversations, was woefully inaccurate. He wants to make sure all of you know that he wasn't so silly as to use a big 'ol forklift just to move around a few hundred pounds of stuff. :)

Picking cherries 2010

From there, the cherries were dumped into a large holding tank with ice cold water where they were washed and left to cool down to the desired temperature. Cooling them down helps to firm the flesh of the cherry, which makes it easier to pit them.

Picking cherries 2010

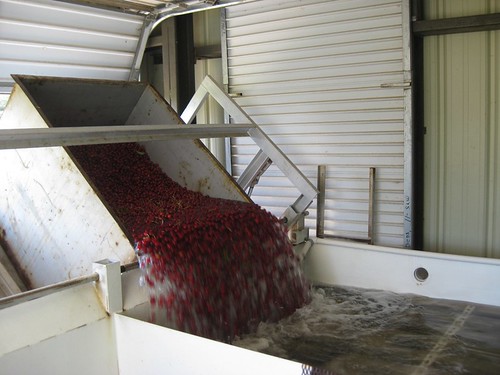
Once the cherries were cooled enough, they were slowly released from the holding tank and then transported up an escalator that drained the water. This is where I was positioned on one of the days. The job here is to pull out as many stems, leaves, twigs, and defective cherries as you possibly can as they whiz by you on the conveyor belt.

Picking cherries 2010

It can be tedious work, but in a way it was kind of fun. I have a somewhat competitive personality, so I rather enjoyed the challenge of trying to fill my bucket of gunk higher than the other people on the assembly line!

Once the escalator reached the top, the cherries were dumped onto another conveyor belt where two or three people were positioned to continue to pull out as many stems and bad cherries as they could.

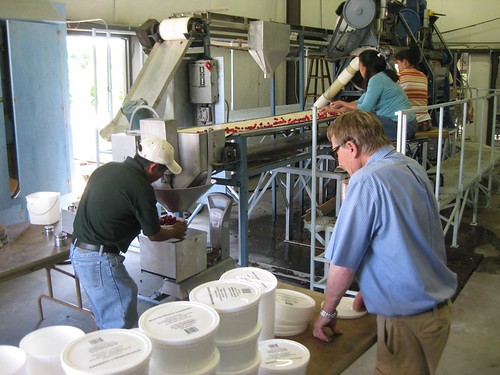
As the cherries moved down the line they were sent into one of two pitting machines. If you've ever had to pit cherries by hand, you would be in awe of the pitters. Each cherry is deposited into a rubber cup with a small hole in the bottom, and a large metal rod comes down and pushes the pit out of the cherry and through the hole in the cup.

Picking cherries 2010

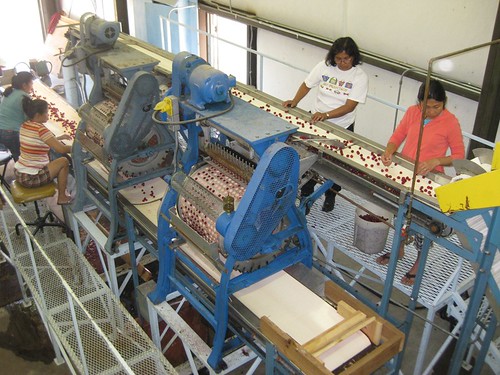
The pitted cherries are dumped onto a lower conveyor belt, where more people are stationed to pick out any remaining bits of stems or bad cherries, and to look for the occasional stray pit that escaped the pitting machine.

The pits are carried by a pipe to a trailer outside of the building where they are deposited into one awe-inspiring large pile of pits.

Picking cherries 2010

That's a lot of pits.

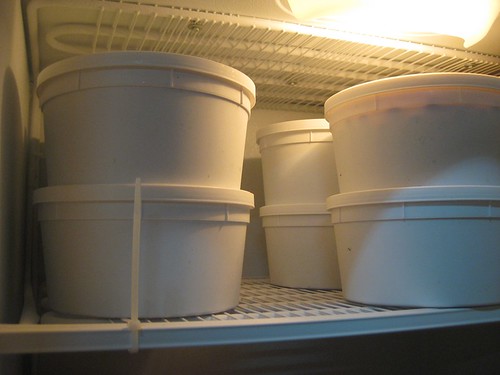
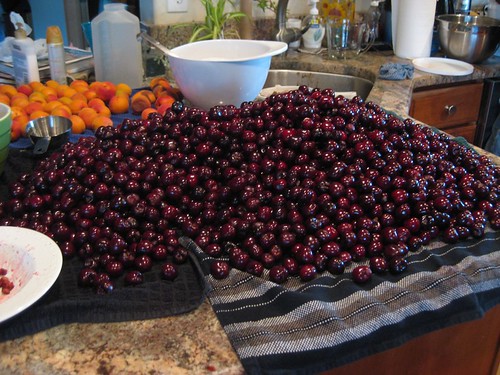
The cherries continue down the assembly line until they are funneled into a waiting container. The containers sit on a scale that is adjusted for a particular weight. Once that weight is reached, the funnel closes so that the full container can be replaced with a new container. Shown here are 4-pound containers. We also filled 8- and 25-pound containers, as well as a few bulk containers of several hundred pounds of cherries.

The very convenient thing about this kind of cherry is that they are immediately placed into the freezer, so the orchard owner isn't under pressure to sell them quickly after they're picked.

Picking cherries 2010

Over the course of both days, we processed approximately 12,200 pounds of cherries. Several hundred pounds of cherries went straight to a local winery to be made into cherry wine. The 25-pound containers are often sold to local bakeries, and the 8-pound containers are often sold to individuals who really like to bake or can, or to retailers as far away as Denver who re-sell them.

As partial payment for my hours of service, I walked away with several of the 4-pound containers, which are a more manageable size for moderately-ambitious canning and baking projects. They're currently sitting in my freezer, awaiting their fate.

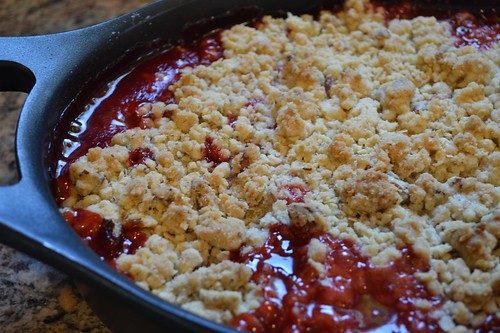
Now I guess it's time to dust off all my canning jars...

Cherry picking 2010

Tuesday, January 5, 2010

Things to do in 2010: Part 1

I am just starting to put some thought into what my New Year's resolutions should be, and already I've decided to have a list of things I want to accomplish in 2010 instead of general resolutions that I can't cross off a list.

First up on my list is to expand the number and variety of things that I cook at home. I came up with a list of 10 things that I want to make an effort to include in my regular meal plan, or at least try once to see if I hate it. I'm a bit embarassed to admit that I've never tried things like beets, parsnips or rutabagas!

1. Parsnips. I see these and other root vegetables listed over and over in recipes, but for some reason these things never make it into my cart at the grocery store. I saw this recipe for roasted parsnips in the latest issue of Sunset magazine, and I decided there's no time like the present to start trying them.


Their other suggestions included mashing them with butter and milk like potatoes, mashing for a soup with crumbled bacon and thyme, shredding raw parsnips with apples and using in a creamy slaw with green onions and grapes, and frying thin slices in hot oil for parsnip chips. Sounds pretty good, huh?

2. Turnips. See #1 above. They just doesn't ever see the inside of my shopping cart. But this recipe for glazed baby turnips and carrots sounds easy enough that I'm willing to give them a go.

3. Rutabagas. Am I starting to sound like a broken record? Are you starting to wonder how I've managed to spend so much of my life living under a rock? But smashed rutabagas with ginger roasted-pears? Are you kidding me? Sign me up!


4. Beets. For some reason, beets have always made me feel slightly uneasy. But this year I'll try 'em. At least once. We'll start with some beets and caramelized onions with feta.

5. Chinese cabbage. Just recently I bought regular cabbage and made two varieties of slaw. I can't remember the last time I bought cabbage before that. I'd like to expand into some of the other cabbages out there, and the Chinese cabbage looked like a good place to start. So I think I'll order some seeds for tenderheart Chinese cabbage and see how it goes.

6. Quinoa. I've heard so much about how good and healthy quinoa is, but have yet to try it. This recipe from Gourmet for quinoa with mango and curried yogurt sounds good.


7. Bison. I've had a bite or two of the husband's bison steak or meatloaf when we've been out to eat, but I haven't really tried making a meal out of it yet. I love beef, but I fear what it is doing to my cholesterol level. So I'm hoping I can get past the mental image and learn to like bison. Did you know that bison has just 1.8 g of fat and cholestrol verus beef's 18g? I'm ready to dig right into this NY strip steak from High Plains Bison!


8. Risotto. I tried making this once several years ago, and I really liked it. I'm going to make an effort this year to make it more often and try some of the bazillion variations out there. I absolutely love cornish game hens, sweet potatoes, and cranberries, so this recipe for cornish game hens with sweet potato risotto and cranberry sauce sounds perfect.

9. Fish (not salmon!). I try to cook salmon fairly often, but I generally avoid all circumstances that involve any other kind of fish. I'm too intimidated by the thought of preparing them (and the thought of eating most fish sort of makes me want to gag). But the husband really likes fish, and we have a lot of good fishing holes pretty close to us where we can get some darn nice trout.

The cookbook I got on our trip to Boulder, Utah, With a Measure of Grace, has a great-sounding recipe for cowboy skillet trout, which involves a molasses marinade and a cornmeal-pecan breading. Yeah, I think I'm gonna like having trout.

10. Bread (and biscuits and pastries). I love carbohydrates but I need to come up with a good way to control my intake of them. Allowing myself to eat only those carbs that I make seems like an easy way to do it. I want not only to learn how to make good bread, biscuits, and pastries, but also develop the patience to actually make them. My previous experience years ago with a bread making machine doesn't count. I'm talking about old-school style, kneading and rolling dough. I might start with the blue-ribbon black-powder buttermilk biscuits from With a Measure of Grace. We had them at the restaurant and they are a-mazing. And with pictures and recipes like this one for spinach feta bread, I'll probably spend a lot of time on The Knead for Bread.


What about you? Do you have any new foods that you want to try? Better yet, do you have any recipe suggestions for any of the foods on my list?

Monday, December 28, 2009

Adventures with the abominable snowman

This photo of Sadie was taken around 5:45 this morning. Since we got home from Wyoming last night, she hasn't ventured far from this spot.

Sadie by fire

I am pleased to report that her body suit was a huge success. It kept her warm and snuggly so she could play in the snow with all of her cousins. And I am even more pleased to report that it was warm enough by mid-day that she didn't have to wear her little booties. (I can hear the sigh of relief out there in blogland!)

Overall, her trip to Wyoming went rather well. She had two pesky young cousins that required constant growls, and she had another handsome cousin who only slightly intimidated her. But then there was Huckleberry. I wish I'd taken a picture of him. To us, he's just a lovable Great Pyrenees that stands about waist tall. To her, he was the abominable snowman. A weimaraner-eating abominable snowman.


He stayed in the mudroom at night, and we'd have to pass by him on our way out to potty before going to bed. Whenever she was near him, she'd back against the closest object, make herself as small as possible, and stare straight at the floor. I swear I could hear her say, "Please don't look at me. Please don't look at me."

And then he'd look at her.

She'd get even smaller and I swear I could hear her say, "Please don't eat me. Please don't eat me." Lucky for her, he just wanted to hug her and squeeze her and call her George.

One of the highlights of the trip was making my first buche de noel with my sister-in-law. My two nieces did the decorations, which included juniper branches with berries that we gathered from an area by the river, small chocolate sprinkles oh-so-carefully placed by Caitlyn to represent ants, and the artful sprinkling of cocoa powder and a layer of powdered sugar snow by Caitlyn and Gabby. I think it looked pretty darn good, and we all agreed that they tasted great.

Bouche de Noel

We used this recipe and made one with caramel cream and one with a raspberry cream. I've always been too intimidated to try making one, but they really aren't that hard.

I hope you all had a fun and relaxing holiday weekend! Did any of you try new recipes or have your own encounter with abominable snowmen?

Friday, July 3, 2009

Bakerella 4th of July cake pops


If you get a spare moment today, please go read the really sweet letter that inspired Bakerella to make these cake pops.

I thank Carlos, his girlfriend, and all of our military men and women who remind me why the 4th of July holiday is about more than hot dogs and fireworks.

Thursday, June 18, 2009

Blueberry pie with almond crumble topping

The other day at the grocery store they had gigantic tubs of blueberries on sale. And despite being up to my eyeballs with tiling the master bedroom, I knew what I had to do. So I grabbed two of the gigantic tubs of blueberries and some almond paste (and a store-bought pie crust, because, you know, I'm in the middle of the world's largest tiling project), and then I skipped all the way home.

I mixed up a batch of thin-set for the tile, and while waiting for it to sit for 10 minutes, I measured out the ingredients for the filling, which includes lots of these bad boys.


7 cups to be exact. (or 32 oz frozen blueberries, not thawed)

In addition to those blue beauties, the filling requires the following:
3/4 cup + 2 tablespoons sugar
1/4 cup corn starch
2 tablespoons fresh lemon juice

I then carried the bucket of thin-set to my mom, plopped some on the floor for her to spread, buttered the backs of three tiles for her, and then ran back to the kitchen to measure the ingredients for the topping:

2/3 cup unbleached flower
7 oz almond paste broken into pieces
1/4 cup unsalted butter cut into 1/2" cubes
1/2 teaspoon salt

I ran in and buttered the backs of three more tiles and plopped down some more thin-set, and then ran back to the stove.

In a heavy large saucepan, I stirred together the sugar and corn starch and then added the blueberries and lemon juice.


And then I cooked them over medium heat, stirring frequently, until they got happy (as determined by being in a thick and bubbly state, which takes about 10-13 minutes). Don't they look happy? Then they went into the fridge for about an hour to cool.


While the blueberry filling was cooling, I went back to helping my poor mom tile my floor. Once I caught up with her, I ran back out to prepare the topping by placing the topping ingredients into a food processor until they formed small clumps. And I started to preheat the oven to 400F.

I put my sad little store-bought pie crust into the pie plate. And then I filled it with happiness.


And then I topped it with more happiness.


And then I put it in the oven and went back to tiling and promptly forgot about it. So the top got a teeny tiny bit darker than I'm willing to show, but that didn't stop any of us from fighting over the last piece (the husband still owes my mom something in trade for it!).


If you don't want to make the pie while trying to lay tile, you can check out the real recipe here courtesy of Bon Appetit July 2007.

Friday, March 6, 2009

Cannelle et Vanille

If you haven't already seen the blog Cannelle et Vanille, go there right now.

Run, don't walk.

But don't go if you're hungry. Or if you're on a diet. And don't bother if you don't like chocolate, or cake, or candy, or anything with sugar in it. And definitely stay away if you don't go ga-ga over gorgeous photos like this one.

Friday, January 9, 2009

For the love of Ebelskivers

Several months ago I spied an Ebelskiver pan—a specially-designed pan for making Danish filled pancakes—in the Williams-Sonoma’s catalog. Then I had the good fortune to taste several variations made by my mother-in-law with cinnamon-apple, lingonberry jam, and cinnamon-sugar fillings. Lucky me, I got a pan of my own for Christmas this year. So far I’ve only had time to make them once—I used a raspberry filling designed for pastries. It was probably a bit sweeter and richer than I would have liked, but it sure didn’t stop me from inhaling them. On the day that I made them, we were leaving for a 10-hour drive back home after visiting my parents, so I took the leftovers with us. When we reached the 7th hour of the drive, I discovered that they make a great snack even when they're cool (although my husband can't vouch for this because I ate all of them...).

Mixing the batter and making the pancakes is a fairly involved process (especially for folks used to just mixing a pancake mix with water and an egg), and it took me a few rounds to master the art of flipping the pancakes over using two wooden skewers, but I think the results were well worth it. I’m anxious to try making them again, and I’ve been searching for some good variations to try.

The Williams-Sonoma website has several recipes. This one for the cinnamon bun ebelskivers makes my mouth water, and they look so good I can almost smell them through the computer monitor.


The lemon mascarpone ones also look like little pieces of joy and happiness.

And I’m tucking away this nifty recipe for pecan pumpkin filled ebelskivers—made with cream cheese and pecan pumpkin butter—for next fall.

When the weather is nicer than the snow we’re getting today, we do a lot of hiking. I was thinking that these would make a great snack to take along because they’re a great finger food once they’ve cooled. The pancake itself isn’t really sweet, so I think they would be great stuffed with cheese and/or lunchmeat, and I also saw a suggestion for sweetened cream cheese with dried fruits and nuts. A few of these along the way, and we should have enough energy to go an extra mile or two on our hikes!

LinkWithin


The Handwork Chronicles | Template By Rockaboo Designs | 2012